Fashion illustration is crucial in fashion design, just as the paint is for an artist, equations to mathematicians and medical knowledge for a doctor. It serves as your designer’s voice expressing the designer’s vision to the viewers. Fashion illustration is the initial step to bringing your ideas to life, and it helps move the design concept from ideation to its realization.
Fashion sketches and fashion illustrations
Every design begins with sketches. The fashion sketch is the initial step to bringing your ideas for fashion to life. You could consider it an outline of your concept. The sketches don’t include an image, but their primary purpose is to present your idea and all its technical details, including the length of the dress and the size to the viewers.
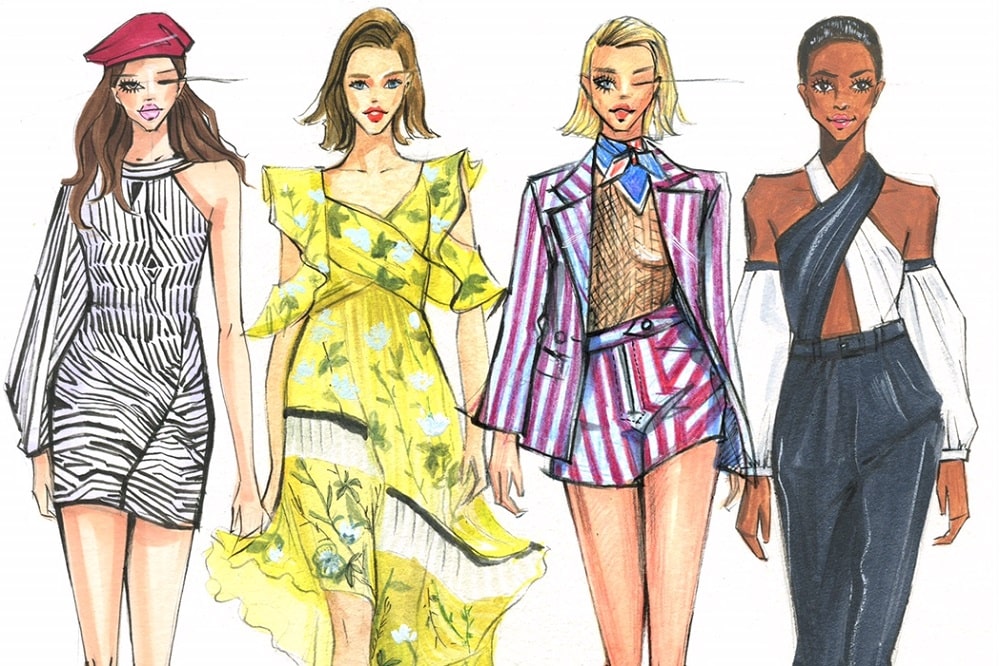
Contrary to flat sketches, Fashion illustrations are more detailed thanks to texture, color, shading, and moving lines. Fashion illustration is the process of sketching, drawing, or painting fashion and design concepts before sending them to a clothing manufacturer. As a result, fashion illustration can be more stylish.
Drawing fashion sketching
The steps below are simple to draw a basic flat style sketch.
Step 1: draw the design of your clothing.
The shape is often called how you shape your clothes. Consider what the fit of your garment is? Or oversized piece?
Step 2: Add design details
Without the design, the garment isn’t possible to exist. Details in design refer to decorative and functional seams, volumes like frills and pleats, fasteners like zips and buttons, and any other elements such as collars, necklines and pockets to stitching details such as embroidery. By including such information, you offer the reader a greater understanding of the finished product with fashionable look.
Step 3: Improve the sketch
The sketch should be refined by erasing any unnecessary lines.
Fashion Illustrations: How do you draw them?
To effectively convey your concept using a fashion illustration, first, you need to know how to use the language. Next, it involves learning how to draw a nine-head figure and then draw the design of your clothing on the constitution and then rendering it to depict an exact texture, textile and print.
What do you need?
To start your journey into fashion illustration, it is essential to get a sketchbook. Sketchbooks are necessary for the designer because it provides an understanding of the designer’s library of ideas, processes, and inspiration and helps to show the process of idea generation and growth.
This is especially crucial if you’re planning to launch the process of creating your line of clothing.
- Sketchbook
- Pencil
- Sharpener
- Eraser
- Pens
- Colored pencils
- Markers
Step 1 Outline.
In the beginning, you must sketch out an outline for your figure. This can be accomplished by either drawing the model from scratch or using a template for fashion figures.
To create your style figure, follow the steps listed below.
Read Also: Why Editorial Fashion Photography is So Great
Step 2: Make guidelines
- Draw nine heads that have similar in dimensions and shape. Label them as one-nine. You should leave a space at the lower right of your page for the feet.
- Draw horizontal lines across each head.
- Create a line that is broken between head 1,25, and 4,25.
- The anatomy should be labelled.
Step 3: Design the Skeleton
- Make your line of balance. It is a vertical line perpendicular to horizontal lines.
- Make an oval shape for your head. Create a line horizontal to the shoulders, approximately two leaders across.
- Create a vertical line around the hips, approximately one and a half to two heads large.
- Create a line horizontal to the waist, approximately one head across.
- Connect the waist, shoulders and hips.
- Draw a line of reference for the arms.
- Draw vertical lines are starting from the waist towards the ankle line guideline.
- Create a cylinder to form the neck.
- Connect the neck and shoulders.
- Draw small ovals to represent the knees. Draw small ovals for your ankles. The ovals should be slightly smaller than the ones for the knees.
Step 4: Create the shape
- To draw arm muscles, create ovals to represent your shoulders, upper bicep and lower arm.
- Create ovals to represent the top leg and lower leg. Draw triangles for feet.
- Create a neck shape draw out the arm outline using the ovals as a guideline.
- Create legs with a more defined shape by using ovals for guidelines.
- Include neckline, bust line as well as underwear lines. Add a princess line.
- Make the figure more precise. Be aware that you need to duplicate what you’ve done in one area on the opposite side. If you’ve drawn only one side, then copy it onto the opposite sides by folding them over the balance line and then drawing over it.
Step 5. Dress the model
You can now begin the fun part: getting dressed in your style. Begin by outlining your ideal shape on your body.
Tips for success: If you find yourself stuck in a creative slump, it’s always an excellent idea to watch the most recent fashion trends as sources of inspiration for silhouette, fabric and hue.
Step 6: Add design details
Like drawing flat, adding elements to your fashion sketch will transform your style from a simple design into a work of art. Since humans are soft bodies, It is essential to show how the clothing drapes around and over the body. The compression folds, like wrinkles, and volume provide a sense of movement in illustrations.
The clothing depicted on the figure could be elaborate or simple, requiring the viewer to use their imagination to fill in the gaps. If you want to be minimalist or detailed, make sure you create illustrations that show your distinct style by incorporating each element. Once you’re satisfied with the way your outfit appears on your body, then sketch your design using a fine liner, eliminating any unnecessary process lines.
Step 7: Rendering
After your drawing is accurate and accurately portrays the shape and details of your clothing, rendering is the process to communicate information about the fabric, the print, and the color selections that create your unique design. Adding shade in this stage is crucial to mimic an actual model wearing your garment and create more motion.
To render, designers concentrate on one specific medium, such as paint, or use a mix of different mediums that include markers, colored pencils and many more. It is essential to experiment with various mediums to match colors, capture prints and texture, and show crucial design elements that will result in compelling and visually captivating illustrations.
Step 8: Determine your signature style
For a beginning artist, it is crucial to learn from other illustrators’ works. However, in time, you’ll be able to discover your unique style. Of course, you have to be ready to experiment with various drawing techniques and rendering media to achieve this.
There is a myriad of factors that define your style. Do you prefer using paint or colored pencils or choose to stick with black and white? What do you use to illustrate the face of your model? What type of clothing do you design? Every little detail works together to create an appearance that is uniquely yours.
How do I define a style croquis?
The croquis can be described as a drawing of a human body that is used as a model for designers to sketch, often in a way that is at a different scale in proportion to human anatomy. It is often known as “the 9-head” figure,” the oversized length lets the designer display additional design details in the sketch. When you are looking for croquis templates, pick the one that fits your style and concept.